“Siding Selection: Which Nails for Your Siding?”
When it comes to siding installation, the choice of nails plays a crucial role in ensuring the durability and stability of the siding. Understanding the different types of siding nails, their materials, and installation techniques is essential for a successful siding project. This article provides a comprehensive guide to siding nails, including the selection process, installation tips, and maintenance considerations.
Key Takeaways
- Choose the right nail material based on the siding material to prevent corrosion and ensure longevity.
- Proper nail length and penetration are essential for secure siding installation.
- Consider thermal expansion and contraction when selecting siding nails to prevent damage in varying climates.
- Stay informed about local building codes and regulations to ensure compliance with siding nail requirements.
- Regular inspection and maintenance of siding, including nail replacement, is crucial for long-term durability.
Understanding Siding Nails: Types and Materials

Differences Between Siding Nails and Common Nails
When selecting nails for siding, it’s crucial to understand that siding nails are specifically designed for the task and differ significantly from common nails. Siding nails are typically made with a thinner shank and a wider head to prevent the nail from pulling through the soft siding material.
Common nails, on the other hand, are more robust and have a thicker shank, making them suitable for more heavy-duty applications like framing. Here are some key differences:
- Siding nails have a wider head for better holding power.
- They are often made from corrosion-resistant materials to withstand the elements.
- The shank of a siding nail is usually ring-shanked for added grip.
Tip: Always choose a nail that’s designed for the type of siding you’re installing to ensure a secure and lasting fit.
Materials Used in Siding Nails
The choice of material for siding nails is crucial to ensure longevity and structural integrity. Stainless steel nails are the most common due to their high resistance to rust and corrosion, making them ideal for a variety of climates and especially suitable for coastal areas where salt can accelerate metal decay. Aluminum nails are lighter and also resist corrosion but are not as strong as stainless steel. For interior or less demanding applications, galvanized steel nails offer a balance between strength and corrosion resistance at a more economical price point.
Copper and silicon bronze nails are less common but provide exceptional durability and are often used in high-end construction due to their longevity and aesthetic appeal. It’s important to match the nail material to the siding material and the environmental conditions it will face.
Tip: When installing siding in coastal areas, always opt for corrosion-resistant fasteners such as stainless steel or specially coated nails to prevent premature wear and failure of the siding.
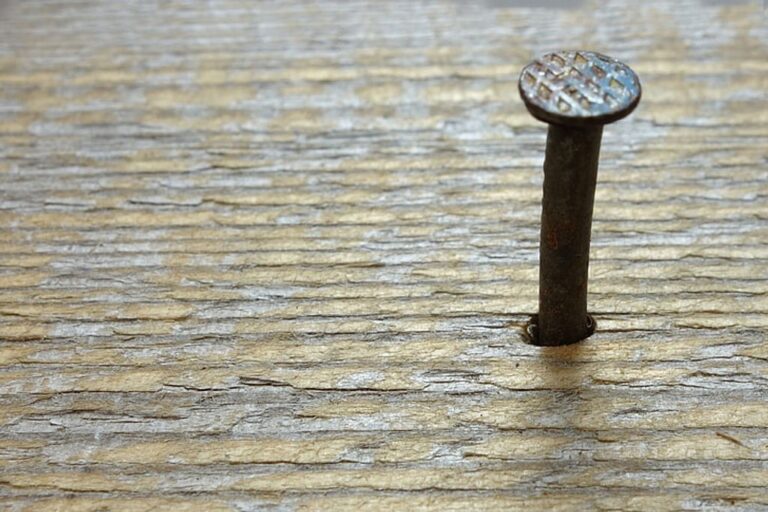
Head Styles and Shank Types
The selection of the right nail head style and shank type is crucial for the longevity and stability of your siding. Head styles vary significantly and are chosen based on the type of siding material and the desired aesthetic. For instance, a larger head provides more holding power and is less likely to pull through soft materials, while a smaller head is less conspicuous and may be preferred for more finished appearances.
Shank types are equally important, as they determine the nail’s gripping strength. Smooth shanks are common for interior work or soft woods, where splitting isn’t a concern. Ring shanks offer superior holding power in materials that are prone to expansion and contraction, and screw shanks are often used in hardwoods for their increased withdrawal resistance.
Always consider the combination of head style and shank type when selecting nails for your siding project to ensure optimal performance and durability.
Choosing the Right Nail for Your Siding Material

Nails for Wood Siding
When selecting nails for wood siding, it’s crucial to choose the right type for a secure and lasting installation. Stainless steel nails are often recommended due to their durability and resistance to corrosion. For those in coastal or humid climates, stainless steel provides the added benefit of withstanding harsh weather conditions.
Ring-shank and spiral nails are preferred for their excellent holding power. These nails have a textured shank that creates more friction in the wood, reducing the likelihood of the nails backing out over time. The length of the nail is also important; it should be long enough to penetrate at least 1 1/2 inches into the studs.
Tip: Always ensure that the nails you choose are compatible with your siding material and that they meet the local building codes.
Here’s a quick reference for some commonly used nails for wood siding:
- MAZE NAILS SS8WS-5: Stainless steel, ring shank, 2-1/2 inches long.
- 15° Wire Coil, Full Round Head, Ring-Shank Siding Nail: Ideal for quick installation with reduced driving force.
- PRO-FIT Spiral Siding Nails: Available in 2 inches (6D) and 2-1/2 inches (8D), hot dipped galvanized for extra grip and resistance.
Nails for Vinyl Siding
When installing vinyl siding, the choice of nails is crucial to ensure a secure and lasting fit. Aluminum nails are often recommended due to their corrosion-resistant properties, which are essential for withstanding the elements without staining the siding. These nails typically have a large head and a slender shank, which allows for the expansion and contraction of the vinyl with temperature changes.
Proper nail selection is not just about material; size also matters. For example, a 1.75-inch ring shank nail provides a strong hold due to its textured design. Here’s a quick reference for commonly used nails for vinyl siding:
- 1.75”-RING SHANK ALUMINUM NAILS: Ideal for their rust-resistant finish and secure hold.
- PRO-FIT 1-1/2 in. Aluminum Siding Nail: Known for a large head and smooth shank that drives quickly and minimizes siding damage.
Tip: Avoid nailing too tightly. Vinyl siding must be able to move freely to accommodate thermal expansion and contraction. Nails should be driven in the center of the nailing slots and should not be hammered all the way in—leave a small gap to allow movement.
Nails for Fiber Cement Siding
When installing fiber cement siding, selecting the correct type of nail is crucial for both the longevity and appearance of the siding. Galvanized or stainless steel nails are typically recommended due to their resistance to corrosion. These nails should have a ring-shank design which provides superior holding power, preventing the siding from loosening over time.
Hot-dipped galvanized nails are a popular choice as they offer enhanced protection against rust. For coastal areas or places with high humidity, stainless steel nails are preferable to prevent corrosion. The length of the nail is also important; it must be long enough to penetrate at least 1 1/4 inches into the studs.
Tip: Always pre-drill holes for the nails to avoid splitting the siding, which can compromise the installation.
When it comes to the diameter, a minimum of 0.09 inches is recommended. Here’s a quick reference for the nail specifications:
- Length: At least 1 1/4 inches
- Diameter: Minimum 0.09 inches
- Material: Galvanized or stainless steel
- Type: Ring-shank
Nails for Metal Siding
When it comes to metal siding, selecting the right type of nail is crucial for both the longevity and the aesthetic of the installation. Aluminum nails are often the preferred choice for metal siding due to their resistance to rust and corrosion. These nails are lightweight yet durable, making them ideal for securing metal panels without adding significant weight or causing discoloration.
Galvanized steel nails are another option, offering robust support for heavier metal siding materials. They are coated with a layer of zinc to protect against corrosion, which is especially important in areas with high humidity or salt exposure. When choosing the length of the nail, it is essential to ensure that it is long enough to penetrate the underlying wood sheathing for a secure hold.
Tip: Always pre-drill holes for the nails to prevent the metal siding from buckling or warping due to thermal expansion and contraction.
For optimal results, consider the following factors when selecting nails for metal siding:
- The compatibility of the nail material with the metal siding to prevent galvanic corrosion.
- The nail’s head style to ensure it fits snugly against the siding without causing dimpling.
- The shank type, which should provide sufficient grip to withstand wind uplift and other environmental stresses.
Installation Techniques for Secure Siding

Proper Nail Length and Penetration
Selecting the proper nail length is crucial for ensuring that siding materials are securely attached to the building structure. Nails should penetrate at least 1 1/4 inches into the studs or sheathing behind the siding. This depth provides a strong hold while preventing damage to the underlying materials.
Penetration is just as important as length. Nails that are too short may not anchor the siding effectively, leading to potential warping or loss of material in adverse weather conditions. Conversely, nails that are too long can puncture electrical wiring or plumbing inside the walls, creating safety hazards.
Tip: Always check the siding manufacturer’s recommendations for nail length and penetration to ensure optimal installation and warranty compliance.
Here is a quick reference guide for nail lengths based on the type of siding:
- Wood Siding: 2" to 2 1/2"
- Vinyl Siding: 1 1/2" to 2"
- Fiber Cement Siding: 1 3/4" to 2 1/4"
- Metal Siding: 1 1/2" to 2"
Remember, the right nail length varies with the thickness of the siding and the type of sheathing used. It’s essential to consider both factors when selecting nails for your siding project.
Nailing Patterns for Optimal Hold
The correct nailing pattern is crucial for ensuring that siding remains secure and performs well over time. For most types of siding, a standard pattern involves nails spaced at regular intervals along the siding’s length. However, the specific spacing can vary based on the siding material and the environmental conditions it will face.
- Wood siding typically requires nails every 16 to 24 inches on center (o.c.) along the studs.
- Vinyl siding benefits from a looser nailing schedule to allow for expansion and contraction, with nails every 12 to 16 inches o.c.
- For fiber cement siding, nails should be spaced closer together, about 8 to 12 inches o.c., to handle the material’s weight and rigidity.
- Metal siding demands precise nailing to prevent warping, with spacing recommendations often provided by the manufacturer.
Tip: Always predrill holes for fiber cement and metal siding to prevent cracking and deformation. Use a nail gun with adjustable pressure settings to ensure nails are driven in with consistent force without damaging the siding material.
Avoiding Common Installation Mistakes
When it comes to avoiding common installation mistakes, proper moisture management is crucial. Failure to correctly install a weather barrier can lead to moisture-related issues, which can compromise the integrity of the siding. It’s essential to ensure that the weather barrier is installed with precision and attention to detail. Additionally, maintaining a consistent nailing pattern and using the appropriate nail length are vital for a secure and durable siding installation. Implementing these best practices can significantly reduce the risk of installation errors and ensure the longevity of the siding.
Weather Considerations for Siding Nails
Corrosion Resistance in Various Climates
Selecting the right nails for your siding is crucial, especially when considering the long-term effects of climate on corrosion resistance. Stainless steel nails, such as 304 stainless steel, are renowned for their ability to resist rust and staining, making them an excellent choice for coastal areas and environments with high humidity. For inland climates, where the risk of corrosion is less severe, other materials like aluminum or galvanized steel can be cost-effective alternatives.
When it comes to vinyl siding, the Building Standards specify the use of corrosion-resistant nails to prevent the deterioration of the fasteners over time. Similarly, for outdoor applications where durability is key, hot-dip galvanized nails offer robust corrosion and rust resistance, ensuring a long service life for your siding.
Tip: Always adhere to the manufacturer’s instructions regarding nail selection to avoid common installation mistakes, such as improper nailing techniques, which can lead to loosening of the siding.
In summary, the choice of nail material should be guided by both the siding material and the local climate conditions to ensure optimal performance and longevity of your siding installation.
Thermal Expansion and Contraction Issues
When selecting siding nails, it’s crucial to consider the effects of thermal expansion and contraction. Siding materials and nails must be able to accommodate the natural movement caused by temperature fluctuations without compromising the integrity of the siding. Aluminum and stainless steel nails are often recommended for their ability to withstand these changes without bending or breaking.
Proper installation is key to managing thermal movement. Nails should be driven in a manner that allows the siding some movement. For instance, vinyl siding requires a different nailing technique than wood siding to allow for expansion and contraction. Here are some general guidelines:
- For vinyl siding, leave a slight gap between the nail head and the siding to allow for movement.
- For wood siding, use nails that are long enough to secure the siding but still permit natural wood movement.
Tip: Always refer to the siding manufacturer’s instructions for specific nailing requirements related to thermal expansion and contraction.
Failure to account for these issues can lead to siding damage, such as buckling or warping, which can be costly to repair. It’s essential to choose the right type of nail and follow the correct installation techniques to ensure a long-lasting, aesthetically pleasing exterior.
Siding Nails and Building Codes

Understanding Local Regulations
When it comes to installing siding, adhering to local regulations is crucial. These regulations are designed to ensure that construction practices are safe, sustainable, and suitable for the specific climate and environmental conditions of the area. It’s essential to consult with your local building department to understand the requirements for siding nails and installation methods in your region.
Building codes can vary significantly from one municipality to another, and they often include detailed specifications for the types of nails that can be used, their size, and the correct installation practices. For example, some areas may require stainless steel nails to prevent corrosion in a humid climate, while others might mandate the use of ring-shank nails for better grip in high-wind zones.
Always verify the local building codes before purchasing your siding nails to avoid costly mistakes and ensure a compliant installation.
Failure to comply with these regulations can lead to fines, the need to redo the work, and even legal liabilities. Therefore, it’s not only about choosing the right nail for the job but also making sure that your choice aligns with the legal standards of your locality.
Ensuring Compliance with Building Standards
When selecting siding nails, it’s crucial to ensure that your choices are not only practical but also compliant with local building standards. These standards are designed to uphold safety, durability, and quality in construction practices. Building codes often specify the types of nails that can be used for different siding materials, as well as the appropriate methods of installation.
To avoid potential legal issues and to ensure the longevity of your siding, always cross-reference your nail selection with the current building regulations in your area. This may involve consulting with a local building inspector or referencing the specific building code documentation.
Remember: Non-compliance can lead to costly repairs and even legal penalties. It is better to invest time in understanding and adhering to these standards than to face the consequences of oversight.
Tip: Keep a checklist of the building code requirements for siding nails handy during your project planning and execution phases to streamline the compliance process.
Maintenance and Repair: Keeping Your Siding Intact

Regular Inspection and Maintenance Tips
Regular inspection and maintenance are crucial for preserving the integrity of your siding. By inspecting your siding regularly, you can identify signs of wear, discoloration, or damage. This allows you to address issues promptly and prevent further deterioration. Additionally, cleaning your siding at regular intervals helps remove dirt, grime, and other accumulated debris, maintaining its aesthetic appeal and structural strength. Implementing a yearly exterior inspection routine can help you identify any potential issues early on, ensuring the longevity of your siding. Remember, proactive maintenance is key to keeping your siding intact and protecting your property value.
Replacing Nails in Damaged Siding
When it comes to replacing nails in damaged siding, it’s important to use the right tools and techniques. Start by carefully removing the damaged nails, ensuring that the surrounding siding material remains intact. Once the old nails are removed, gently insert the new nails into the existing holes, taking care not to cause further damage. Additionally, consider using a paintable caulk to cover the fasteners and ensure a smooth finish. Regular inspection and maintenance can help identify damaged siding early, allowing for timely repairs and preventing more extensive damage. Implementing these maintenance practices can significantly extend the lifespan of your siding and maintain the integrity of your home’s exterior.
When it comes to maintaining the integrity of your home, proper siding maintenance and repair are essential. Keeping your siding intact not only enhances the curb appeal of your property but also protects it from the elements. At NAILinspire.com, we understand the importance of home maintenance and offer valuable resources to help you keep your siding in top condition. Whether you need tips on DIY repairs or professional maintenance services, our ultimate online nail art design library has you covered. Visit NAILinspire.com today and discover the secrets to maintaining and repairing your siding with ease.
Frequently Asked Questions
What are the differences between siding nails and common nails?
Siding nails are specifically designed for use in siding applications and have features that make them more suitable for this purpose, such as corrosion resistance and holding power. Common nails, on the other hand, are general-purpose nails that may not be ideal for siding installations.
What materials are used in siding nails?
Siding nails are commonly made from materials such as stainless steel, aluminum, or hot-dipped galvanized steel to provide durability and resistance to corrosion. The choice of material depends on the specific requirements of the siding material and the environmental conditions.
What are the head styles and shank types of siding nails?
Siding nails come in various head styles, including flat, checkered, and round heads, as well as different shank types such as smooth, ring shank, and spiral shank. The choice of head style and shank type depends on the specific siding material and installation requirements.
How do I choose the right nail for wood siding?
When selecting nails for wood siding, it is important to choose nails that are corrosion-resistant and compatible with wood, such as stainless steel or hot-dipped galvanized nails. The length and gauge of the nail should also be suitable for the thickness of the wood siding.
What type of nails should I use for vinyl siding?
For vinyl siding, it is recommended to use nails with a wide, flat head and a shank designed to securely hold the vinyl material in place. Stainless steel or aluminum nails are often used for vinyl siding to prevent corrosion and ensure a long-lasting installation.
How do I maintain and repair siding nails?
Regular inspection and maintenance of siding nails involve checking for signs of corrosion, loose nails, or damage to the siding material. If nails need to be replaced due to damage or corrosion, it is important to use nails that are compatible with the siding material and meet building code requirements.